Serverless Recipe Sharing App with AWS Cognito and Terraform
Hello! Welcome to my new blog post. As I continue to grow in my journey toward becoming a cloud engineer, I’m excited to share the projects I’ve been building and the lessons I’m learning along the way. Transitioning into cloud engineering has been both challenging and rewarding — and one of the best ways I’ve found to truly understand the cloud is by building real-world applications using AWS.
In this post, I’ll walk you through a recent project I built from the ground up: a serverless recipe sharing app powered by a suite of AWS services. This project not only helped me strengthen my skills in designing cloud-native architectures, but also gave me hands-on experience with essential tools like Amazon Cognito, API Gateway, Lambda, DynamoDB, and more.
Whether you’re a fellow learner, a cloud enthusiast, or someone curious about serverless development, I hope this inspires you to build, break, and grow with every line of infrastructure you write.
The Concept

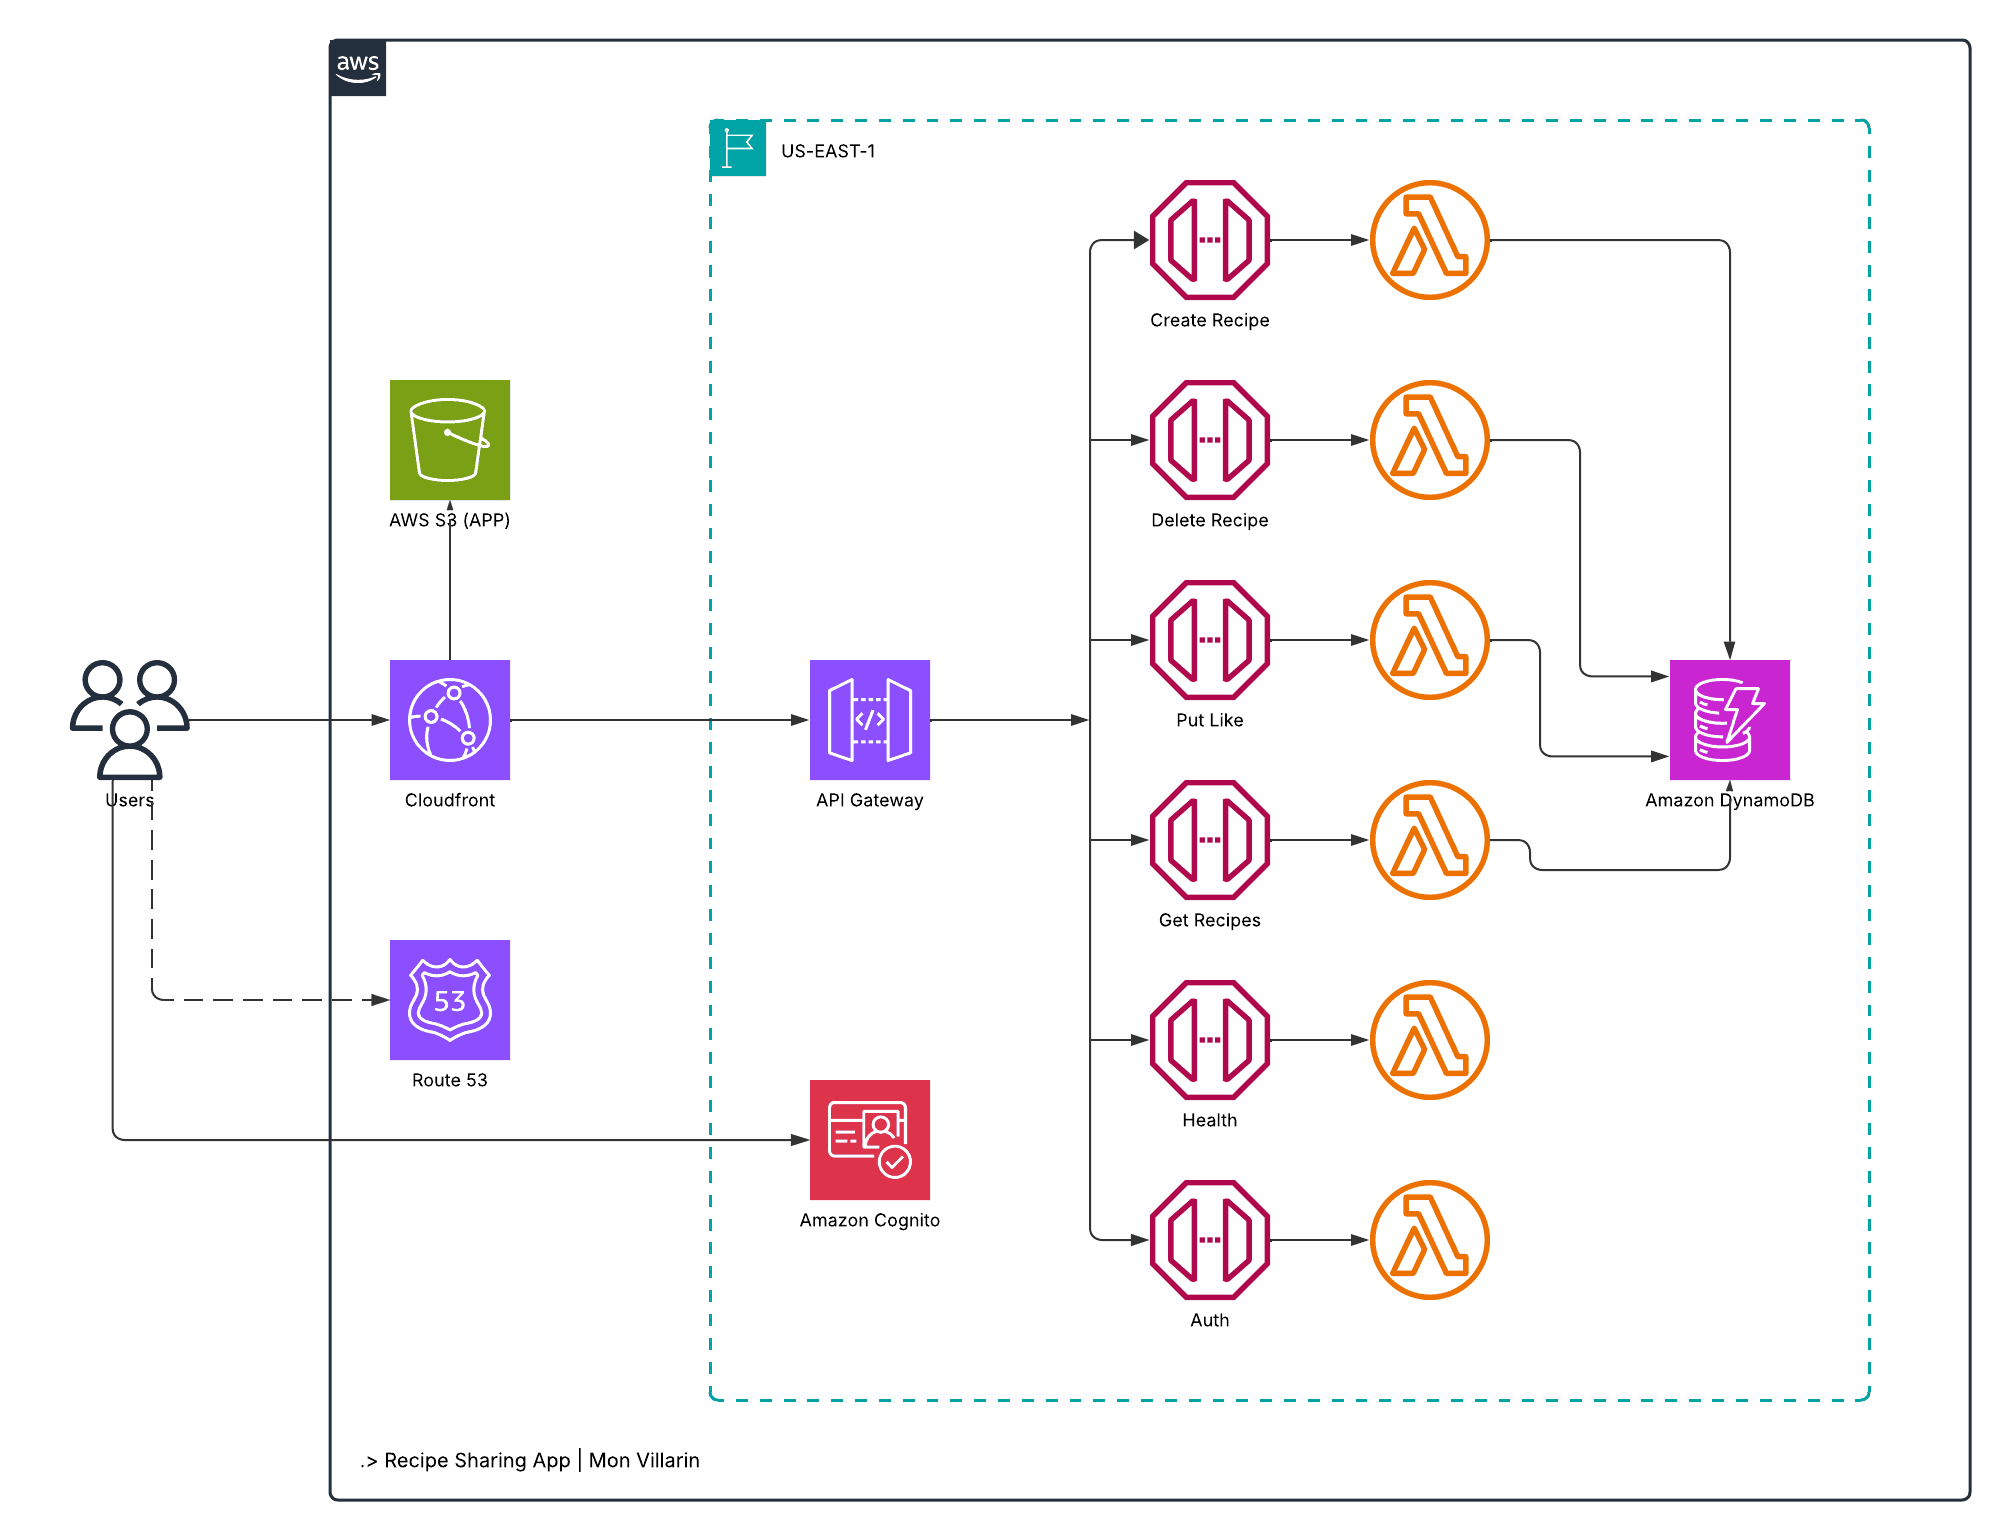
The architecture of this application follows a typical AWS serverless design, leveraging fully managed services to ensure scalability, performance, and minimal operational overhead. The infrastructure includes key AWS resources such as Amazon Route 53, CloudFront, Amazon S3, along with services like Amazon API Gateway, AWS Lambda, Amazon Cognito, and Amazon DynamoDB.
Here’s how the system works from end to end:
User requests are first resolved by Route 53, which handles DNS routing. These requests are directed to Amazon CloudFront, a global content delivery network that serves the frontend assets stored in Amazon S3. This setup ensures that users experience low-latency access regardless of their location.
Once the frontend is loaded, users can browse and search for recipes without authentication. When a user performs a search, the frontend sends a request to a public API Gateway endpoint, which forwards the request to an AWS Lambda function. The function then queries DynamoDB for matching recipe data and returns the results to the user interface.
To share a recipe, users must first authenticate via Amazon Cognito, which handles user sign-up, sign-in, and secure token issuance. Once authenticated, users gain access to the admin interface where they can submit their recipes.
When a recipe is submitted, the data is sent through an authenticated API Gateway endpoint, which invokes another Lambda function responsible for validating and writing the data to DynamoDB.
This serverless design is not only efficient and cost-effective, but also secure and highly scalable. By offloading infrastructure management to AWS, the application can automatically scale with demand, maintain low latency, and ensure user data is protected through built-in security services.
How I Developed the Frontend
I typically build my projects starting from the frontend and work my way to the backend, following the architecture outlined in the diagram. As mentioned earlier, the core functionality of this project involves users making read and write requests to and from the database. Since a static HTML site alone cannot directly interact with a backend service like DynamoDB, there's no alternative but to use JavaScript to bridge the gap between the frontend and the database.
User Interface

To achieve this, I chose to use React.js — a popular JavaScript library for building user interfaces, particularly well-suited for Single Page Applications (SPAs). React allows for dynamic data handling, seamless routing, and efficient UI updates, all within a single HTML page. Additionally, since I wanted to avoid managing multiple static HTML files for different views or pages, React provided the flexibility and scalability I needed to build a modern, maintainable frontend.
The hard part is over! atleast for me, because i’m not a coder myself.
S3

After thoroughly scrutinizing the design and functionality of the user interface, the next step is to create an Amazon S3 bucket to host the frontend. Creating an S3 bucket is a straightforward process: simply provide a unique name for the bucket and click “Create Bucket.”
Once the bucket is created, it's important to enable "Static Website Hosting" in the bucket properties. This setting allows the bucket to serve your static frontend assets (HTML, CSS, JavaScript) over HTTP, making your application accessible via the web.
Cloudfront
Next on the list is Amazon CloudFront. CloudFront is configured to route traffic to the S3 bucket created earlier, serving as a content delivery network (CDN) to distribute static assets with low latency and high availability.
To set this up, I created a CloudFront distribution and specified the S3 bucket as the origin domain. Additionally, I configured Origin Access Control (OAC) to securely restrict access to the S3 bucket, ensuring that content can only be served through CloudFront.
For enhanced security and a seamless user experience, I associated the distribution with a custom SSL certificate issued by AWS Certificate Manager (ACM). This enables HTTPS support for a custom domain, ensuring encrypted communication between users and the CDN.
Route 53

Since I already have a custom domain hosted in Amazon Route 53 (monvillarin.com), I created a subdomain under the same hosted zone: recipe.monvillarin.com To route traffic from this subdomain to my CloudFront distribution, I added an A record (alias) in Route 53.
This A record points directly to the CloudFront distribution, enabling users to access the application through a clean, custom URL while benefiting from CloudFront’s performance and security features.
Amazon Cognito

Amazon Cognito is a fully managed authentication and authorization service that allows users to sign up and sign in using a username and password, or via federated identity providers such as Google, Facebook, or enterprise SAML providers.
From a technical perspective, when a user successfully signs in, Cognito authenticates the credentials against the User Pool and returns a set of JSON Web Tokens (JWTs) — including an ID token, access token, and refresh token. These tokens serve as proof of authentication.
The frontend application then includes the access token in the authorization header when making requests to Amazon API Gateway. API Gateway uses a Cognito Authorizer to validate the token. If the token is valid and not expired, the request is forwarded to the AWS Lambda function, which then processes the logic and writes the data to Amazon DynamoDB.
And Here Comes the Backend
API Gateway and Lambda Functions

The Recipe Sharing App is configured with a single API Gateway that defines six distinct routes, each serving a specific purpose within the application. Every route is associated with its own HTTP method and is integrated with a corresponding AWS Lambda function to handle the request logic.
For example, the route with the path /create-recipes and the HTTP method POST is connected to a Lambda function responsible for writing recipe data to Amazon DynamoDB. Similarly, other routes are designed to handle tasks such as retrieving recipes, updating entries, deleting records, and more — each mapped to its respective Lambda function for modular and maintainable backend logic.
DynamoDB Table
The final component in the architecture diagram is Amazon DynamoDB, which is responsible for handling and storing application data, such as user-created recipes. DynamoDB is a fully managed NoSQL database known for its scalability, high availability, and low-latency data access. These characteristics make it particularly well-suited for serverless architectures, where fast, reliable, and elastic data storage is essential.
Final Thoughts
And that’s how I built my Recipe Sharing App — starting from designing the architecture diagram, writing Infrastructure as Code (IaC) configurations (yes, you heard it right — I’m not a ClickOps person), and finally provisioning the entire infrastructure.
Writing IaC with tools like Terraform is never as easy as it seems, even for small projects like this one. We may be living in the age of AI-assisted coding, but I firmly believe that every good developer must understand the logic behind their code — not just what it does, but why it works.

I honestly lost count of how many times I ran terraform apply and terraform destroy. Every failed deployment felt like a nudge to dig deeper — tweak the code, test again, and repeat — until I achieved the outcome I was aiming for. This cycle of trial and improvement is exactly where perseverance comes in — a quality that every aspiring cloud engineer should embrace.
LinkedIn: https://www.linkedin.com/in/ramon-villarin/
Portfolio Site: MonVillarin.com
Github Project Repo: https://github.com/kurokood/recipe_sharing_app/tree/v2